Car theft and unauthorized use are still real concerns for vehicle owners, dealers, rental operators, and fleet managers. A kill switch can add another layer of protection by interrupting the circuit a vehicle needs to start. When the switch is off, the vehicle should not start, even if someone has the key.
This guide explains how a basic manual kill switch is installed, what safety steps matter, and when it makes more sense to use a professional installer or a GPS-enabled solution like the Trackhawk GPS Kill Switch. If you are working on a vehicle you own or are authorized to manage, the goal is simple: make the vehicle harder to misuse without creating safety or reliability problems.
What Is a Kill Switch?
A kill switch is a device that interrupts an electrical circuit required for the vehicle to start. In a basic setup, the switch is hidden inside the vehicle and manually turned on or off. When the circuit is interrupted, the starter, ignition, or fuel pump circuit cannot complete its normal function.
A kill switch is different from a standard alarm. An alarm warns you that something is happening. A kill switch helps prevent the vehicle from starting in the first place. For a deeper definition, see Trackhawk’s guide to what ignition kill switches are.
Why Install a Kill Switch?
Installing a kill switch can help deter theft, reduce unauthorized use, and give owners another layer of control. It is not foolproof, and it should not be treated as the only security measure on a vehicle, but it can make a vehicle harder to drive away.
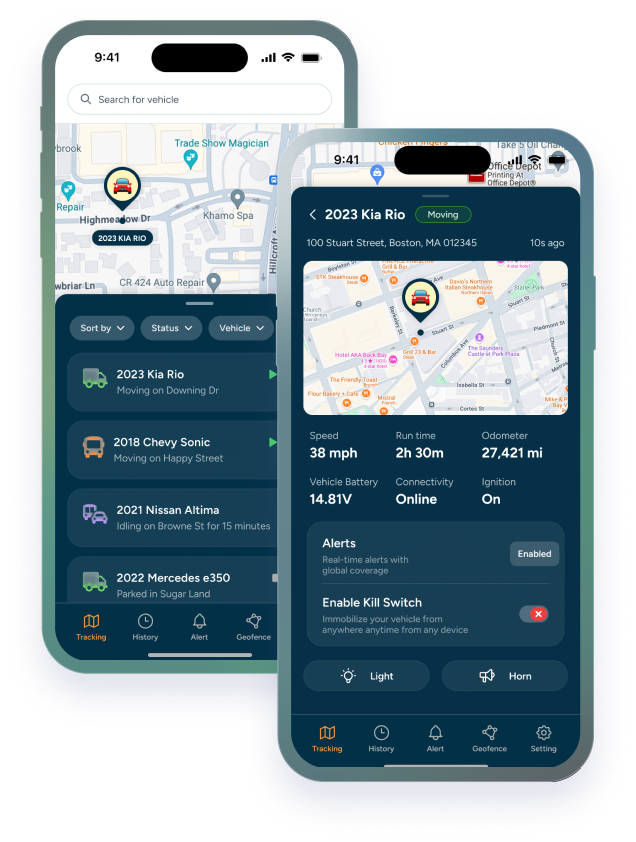
For individual vehicle owners, that may mean extra peace of mind. For businesses, the stakes can be higher. Rental operators, BHPH dealers, field service companies, and fleet managers may need more than a hidden toggle switch. They may need location tracking, tamper alerts, user permissions, and controlled immobilization from a dashboard or mobile app.
Manual Kill Switch vs. GPS Kill Switch
A manual kill switch is usually a physical switch hidden in the vehicle. The driver must know where it is and turn it on or off by hand.
A GPS kill switch combines starter-interrupt functionality with GPS tracking and software access. Instead of relying only on a hidden switch, authorized users can monitor vehicle location, receive alerts, and manage immobilization through a platform. For businesses, this can be especially useful because the same system can support recovery, geofencing, driver behavior visibility, and fleet oversight.
A rugged or outdoor-use vehicle may require different hardware than a standard passenger car. If the vehicle is exposed to weather, used around equipment, or installed in a harsher environment, Trackhawk’s Waterproof Kill Switch may be a better fit than a basic interior-only setup.
Tools and Materials Needed
Before beginning a basic manual installation, gather the right tools and materials:
- Manual kill switch or GPS-enabled kill switch hardware, depending on your setup
- Vehicle-specific wiring diagram
- Wire cutters and wire strippers
- Electrical tape
- Screwdrivers, flathead and Phillips
- Wrench set
- Multimeter for testing
- Heat shrink tubing or proper wire protection
- Crimp connectors or soldering tools, depending on the installation method
Do not guess which wire to cut. Vehicle wiring varies by make, model, year, and trim. If you are not comfortable identifying circuits safely, use a qualified installer.
Before You Start: Safety and Installation Notes
Only install a kill switch on a vehicle you own or are authorized to manage. Incorrect wiring can prevent the vehicle from starting, damage components, trigger warning lights, or create safety issues.
Before working on the vehicle:
- Review a vehicle-specific wiring diagram.
- Disconnect the battery before cutting or connecting wires.
- Avoid airbag, safety restraint, and critical vehicle-control wiring.
- Use proper insulation and secure connections.
- Test the vehicle carefully after installation.
- Consider professional installation for hardwired GPS kill switch systems.
If you want help finding someone who can install a hardwired device, use Trackhawk’s Installer Locator.
Step-by-Step Guide to Installing a Kill Switch
Step 1: Choose a Location for the Switch
Choose a location that is discreet but still accessible to the authorized driver. Common locations include under the dashboard, inside the glove compartment, near the center console, or under the driver’s seat.
The location should not be obvious to someone unfamiliar with the vehicle. At the same time, it should not interfere with pedals, steering, airbags, seat movement, or normal driving.
Step 2: Disconnect the Battery
Before working on the electrical system, disconnect the negative battery terminal. This helps reduce the risk of accidental short circuits while you work on wiring.
Wait a few minutes after disconnecting power before touching wiring near sensitive electronics. If your vehicle has special battery-disconnect procedures, follow the manufacturer’s guidance.
Step 3: Identify the Circuit to Interrupt
A kill switch must interrupt a circuit required for starting the vehicle. Common choices include the starter circuit, ignition circuit, or fuel pump circuit, depending on the vehicle and install plan.
Use a wiring diagram and a multimeter to confirm the correct wire. Do not rely on wire color alone. Wire colors can vary, and mistakes can cause difficult electrical problems.
Step 4: Cut and Prepare the Wire
Once the correct circuit is confirmed, cut the wire with enough slack on both sides to make clean connections. Strip a small amount of insulation from each end so the wire can be connected to the switch.
Keep the work area organized. Do not leave exposed copper or loose wires where they can touch metal or other circuits.
Step 5: Connect the Switch
Connect one cut end of the wire to one terminal of the switch and the other cut end to the second terminal. The switch should open and close the circuit cleanly.
Use solder or quality crimp connectors, depending on your preferred method and vehicle environment. Protect the connections with heat shrink tubing or electrical insulation so the wiring is secure and protected from vibration.
Step 6: Mount the Switch
Mount the switch in the selected location. Depending on the switch and mounting point, you may need to drill a small hole or use a bracket.
Make sure the switch is secure and does not rattle, hang loose, or interfere with vehicle controls. If the switch is hidden behind a panel, confirm that the panel can be reinstalled correctly.
Step 7: Reconnect the Battery
After the switch is connected and mounted, reconnect the negative battery terminal. Confirm that no tools, loose wires, or exposed connections remain near the work area.
Step 8: Test the Switch
Test the system before driving. With the switch in the disabled position, the vehicle should not start. With the switch in the enabled position, the vehicle should start normally.
Test more than once. If the vehicle behaves unpredictably, disconnect the battery again and inspect the installation. Do not drive the vehicle until the wiring is stable and the switch works consistently.
When to Use a Professional Installer
A basic manual switch may be manageable for someone with automotive electrical experience. A GPS-enabled kill switch or starter-interrupt system is different. These systems involve hardware placement, wiring, software activation, and safety checks.
Professional installation is usually the better choice when:
- The vehicle is part of a fleet, rental operation, dealership, or BHPH portfolio.
- The device is hardwired.
- You need GPS tracking, alerts, and immobilization in one system.
- You are installing on multiple vehicles.
- You are unsure which circuit should be interrupted.
- The vehicle has advanced electronics or warranty considerations.
For businesses, installation consistency matters. A clean install reduces tampering risk, protects vehicle reliability, and helps make sure the device works as intended.
Additional Tips
- Do not label the switch obviously. If you need a reference, keep it discreet so it does not reveal the switch to someone else.
- Test it regularly. Periodic testing helps you catch issues before you need the switch.
- Protect all wiring. Loose or exposed wires can cause intermittent problems.
- Avoid unsafe locations. Do not place a switch where it can be bumped accidentally while driving.
- Pair it with other security layers. GPS tracking, geofencing, tamper alerts, and driver behavior alerts can all add value beyond a manual switch.
Conclusion
Installing a kill switch can add a practical layer of protection to a vehicle, but the installation needs to be safe, intentional, and matched to the vehicle. A basic manual switch may work for a personal car, while a GPS-enabled kill switch is often a better fit for businesses that need visibility, alerts, and controlled immobilization.
If you manage vehicles for a dealership, rental operation, service business, or fleet, Trackhawk’s GPS kill switch options can help you move beyond a hidden toggle switch and into a smarter tracking and security system. Start with the right hardware, use proper installation support, and make sure every vehicle is protected without compromising safety.